如何给程序添加自定义皮肤

来源:https://documentation.devexpress.com/#SkinEditor/CustomDocument2546
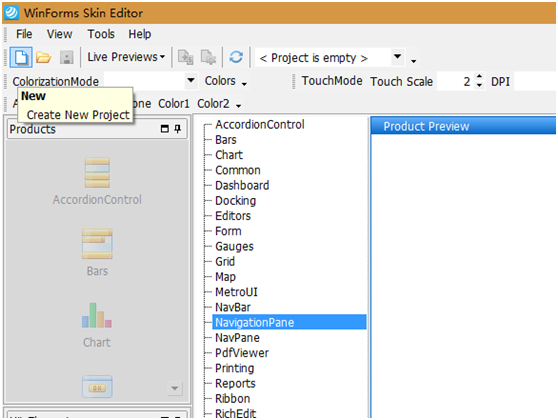
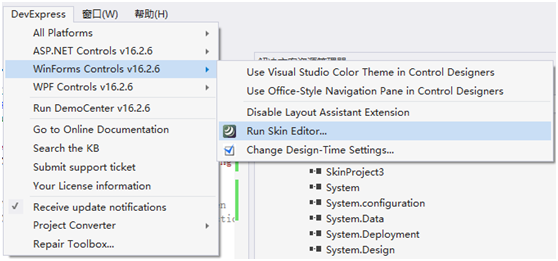
1、在VS里,通过Devexpress>Winform Controls v…>Run Skin Editor启动皮肤编辑器

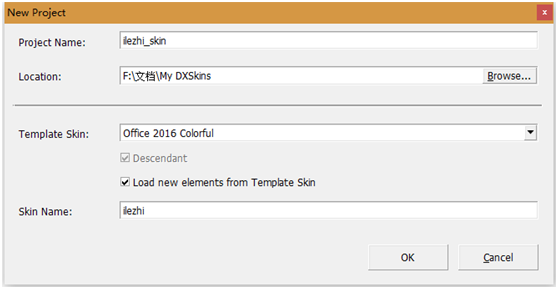
2、新建皮肤项目

3、选择基础皮肤,记住新皮肤名称(skin name)

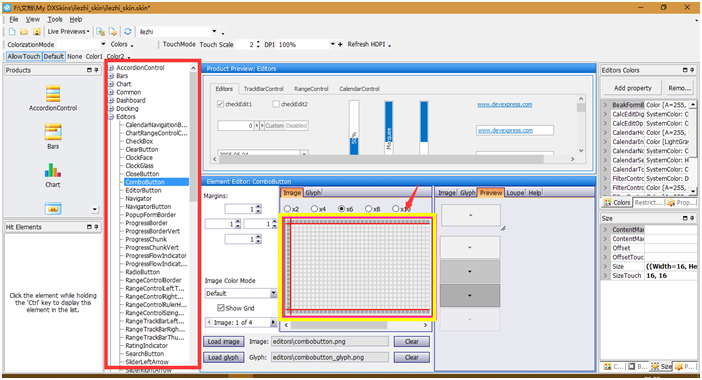
4、选择要修改的控件,双击黄框部分进行图像编辑。
注:请在Tools>Options…菜单下,指定图像编辑器程序

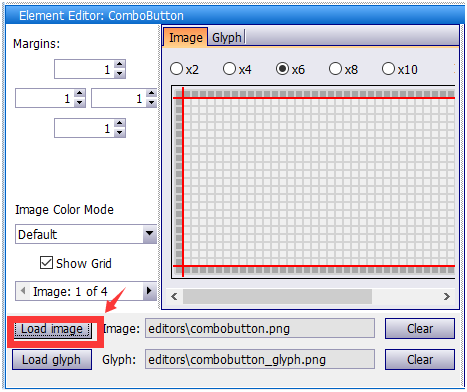
5、图像编辑完成后,单击【Load Image】等进行图像替换

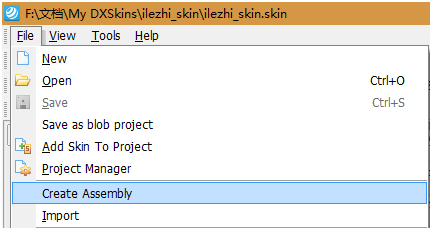
6、保存工程后,通过菜单File>Create Assembly生成dll。默认在文档\My DXSkins文件夹下

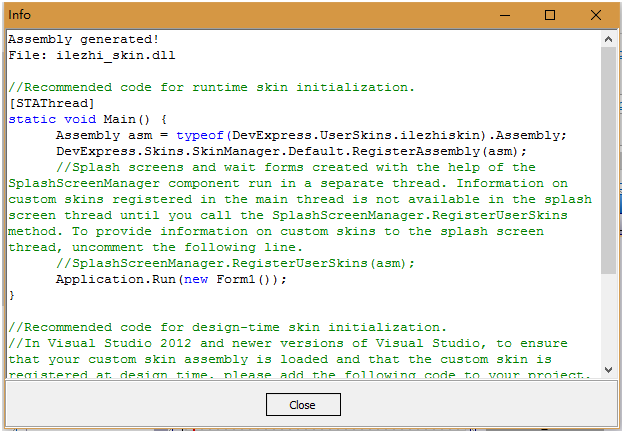
7、随后弹出如下窗口。将这些内容对应地复制到解决方案的 Program.cs/Program.vb 文件的方法里。

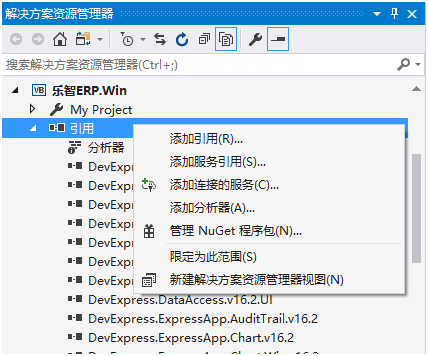
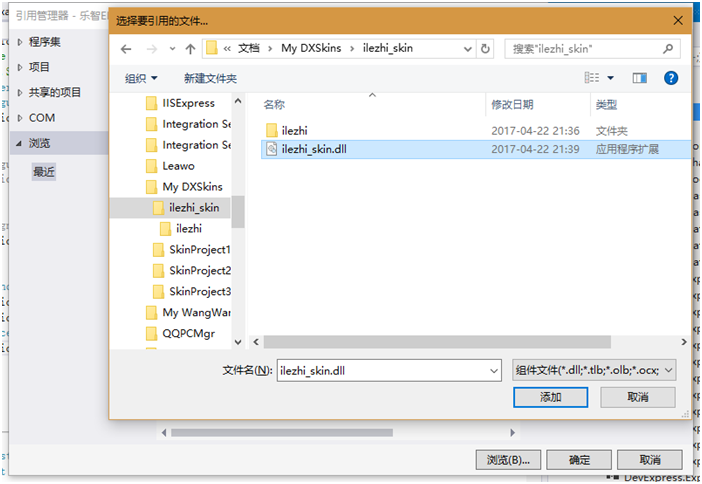
8、打开【解决方案资源管理器】,添加引用
注:添加完成后,需要保存解决方案,重启VS。

9、打开【Program.vb】文件,添加如下内容。

注:参考步骤7内容

Imports System
Imports System.Configuration
Imports System.Windows.Forms
Imports DevExpress.Persistent.Base
Imports DevExpress.ExpressApp
Imports DevExpress.ExpressApp.Security
Imports DevExpress.ExpressApp.Win
Imports DevExpress.Persistent.BaseImpl
Imports 乐智ERP.Win
Imports DevExpress.Skins
Imports System.ComponentModel
Imports DevExpress.LookAndFeel

Public Class Program

    <STAThread()>
    Public Shared Sub Main(ByVal arguments() As String)


        '开始
        Dim asm As System.Reflection.Assembly = GetType(DevExpress.UserSkins.ilezhiskin).Assembly
        DevExpress.Skins.SkinManager.Default.RegisterAssembly(asm)
        SkinManager.EnableFormSkins()
        '结束


#If EASYTEST Then
              DevExpress.ExpressApp.Win.EasyTest.EasyTestRemotingRegistration.Register()
#End If

        Application.EnableVisualStyles()
        Application.SetCompatibleTextRenderingDefault(False)
        EditModelPermission.AlwaysGranted = System.Diagnostics.Debugger.IsAttached
        If Tracing.GetFileLocationFromSettings() = DevExpress.Persistent.Base.FileLocation.CurrentUserApplicationDataFolder Then
            Tracing.LocalUserAppDataPath = Application.LocalUserAppDataPath
        End If
        Tracing.Initialize()
        Dim _application As 乐智ERPWindowsFormsApplication = New 乐智ERPWindowsFormsApplication()
        ' Refer to the https://documentation.devexpress.com/eXpressAppFramework/CustomDocument112680.aspx help article for more details on how to provide a custom splash form.
        '_application.SplashScreen = New DevExpress.ExpressApp.Win.Utils.DXSplashScreen("YourSplashImage.png")
        SecurityAdapterHelper.Enable()
        If (Not ConfigurationManager.ConnectionStrings.Item("ConnectionString") Is Nothing) Then
            _application.ConnectionString = ConfigurationManager.ConnectionStrings.Item("ConnectionString").ConnectionString
        End If
#If EASYTEST Then
        If (Not ConfigurationManager.ConnectionStrings.Item("EasyTestConnectionString") Is Nothing) Then
            _application.ConnectionString = ConfigurationManager.ConnectionStrings.Item("EasyTestConnectionString").ConnectionString
        End If
#End If
        If System.Diagnostics.Debugger.IsAttached Then
            _application.DatabaseUpdateMode = DatabaseUpdateMode.UpdateDatabaseAlways
        End If
        Try
            '开始
            UserLookAndFeel.Default.SkinName = "ilezhi"
            ‘结束
            _application.Setup()
            _application.Start()
        Catch e As Exception
            _application.HandleException(e)
        End Try
    End Sub
End Class

’开始
Public Class SkinRegistration
    Inherits Component

    Public Sub New()
        DevExpress.Skins.SkinManager.Default.RegisterAssembly(GetType(DevExpress.UserSkins.ilezhiskin).Assembly)
    End Sub
End Class
‘结束


======================= 有用的皮肤数据=======================

Common > TextBorder,文本边框


GridView.RowCount 与 GridView.DataRowCount 的区别

RowCount

GridView.RowCount Property | WinForms Controls | DevExpress Help

This property overrides the BaseView.RowCount property to increment its value in the following cases:

NoteDetail pattern Views do not contain data and they are never displayed within XtraGrid. So, the RowCount member must not be invoked for these Views. The RowCount member can only be used with real Views that are displayed within the Grid Control. The real Views with which an end-user interacts at runtime can be accessed using the following methods.

DataRowCount

BaseView.DataRowCount Property | WinForms Controls | DevExpress Help

Note that data rows can be hidden within collapsed groups when data grouping is applied. The DataRowCount property returns the total number of data rows regardless of whether they are within collapsed groups or not. Also, the property’s return value is not always the same as the number of records within the associated data source. When data filtering is applied, the DataRowCount property returns the number of rows that match the filter condition.

NoteDetail pattern Views do not contain data and they are never displayed within XtraGrid. So, the DataRowCount member must not be invoked for these Views. The DataRowCount member can only be used with real Views that are displayed within the Grid Control. The real Views with which an end-user interacts at runtime can be accessed using the following methods.

试比较:

Private Sub GridView1_MouseDown(sender As Object, e As MouseEventArgs) Handles GridView1.MouseDown
        Dim view As GridView = TryCast(sender, GridView)
        Dim hitInfo As GridHitInfo = view.CalcHitInfo(e.Location)
        Select Case hitInfo.HitTest
            Case GridHitTest.Column
                SelectColumn(view, hitInfo)
            Case Else                ' 
                view.OptionsSelection.MultiSelect = False
                view.OptionsSelection.MultiSelectMode = GridMultiSelectMode.RowSelect
        End Select
 End Sub

 Private Sub SelectColumn(ByRef View As GridView, ByRef hitinfo As GridHitInfo)
        '全选列(不排列)
        View.OptionsSelection.MultiSelect = True
        View.OptionsSelection.MultiSelectMode = GridMultiSelectMode.CellSelect
        View.OptionsCustomization.AllowSort = False
        View.ClearSelection()

        View.SelectCells(New GridCell(0, hitinfo.Column), New GridCell(View.DataRowCount - 1, hitinfo.Column))
        View.OptionsCustomization.AllowSort = True
End Sub


Flash Player 支持以下 HTML 标签

语言版本 : ActionScript 3.0
Player 版本 : Flash Player 9

Flash Player 支持以下 HTML 标签:

标签 Description
锚标签 <a> 标签创建超文本链接并支持以下属性:

  • href:该 URL 可以是绝对路径或相对路径(相对于加载页的 SWF 文件的位置)。 http://www.adobe.com 示例表示对 URL 的绝对引用;/index.html 示例表示相对引用。 绝对 URL 必须以 http:// 为前缀,否则 Flash 会将其视为相对 URL。
  • event:使用 event 属性 (attribute) 来指定在用户单击超文本链接时调度的 link TextEvent 的 text 属性 (property)。 例如 event:myEvent;在用户单击此超文本链接时,文本字段会调度其 text 属性设置为 "myEvent"link TextEvent。
  • target:指定加载页面的目标窗口的名称。 选项包括 _self_blank_parent_top_self 选项指定当前窗口中的当前帧,_blank 指定一个新窗口,_parent 指定当前帧的父级,而 _top 指定当前窗口中的顶级帧。

可以使用 link 事件来使链接在 SWF 文件中执行 ActionScript 函数,而不是打开 URL。

还可以使用样式表为锚标签定义 a:linka:hovera:active 样式。

粗体标签 <b> 标签以粗体形式呈现文本。 粗体必须可用于所使用的字体。
换行标签 <br> 标签将在文本字段中创建一个换行符。 若要使用此标签,您必须将文本字段设置为多行文本字段。
字体标签 <font> 标签指定一种字体或一个字体列表来显示文本。字体标签支持以下属性:

  • color:只支持十六进制颜色 (#FFFFFF) 值。
  • face:指定要使用的字体的名称。 如下例所示,您可以指定一个以逗号分隔的字体名称的列表,在这种情况下,Flash Player 选择第一个可用字体。 如果用户计算机系统上没有安装指定字体,或指定字体未嵌入 SWF 文件中,则 Flash Player 将选择替代字体。
  • size:指定字体的大小。 您可以使用绝对像素大小(如 16 或 18),也可以使用相对磅值(如 +2 或 -4)。
图像标签 使用 <img> 标签可将外部图像文件(JPEG、GIF、PNG)、SWF 文件和影片剪辑嵌入到文本字段中。 在文本字段中,文本在嵌入的图像旁自动换行。 若要使用该标签,必须将文本字段设置为多行和文本换行。<img> 标签支持以下属性:

  • src:指定图像或 SWF 文件的 URL,或库中影片剪辑元件的链接标识符。 此属性是必需的,所有其它属性都是可选的。 外部文件(JPEG、GIF、PNG 和 SWF 文件)只有在完全下载之后才能显示。
  • width:所插入的图像、SWF 文件或影片剪辑的宽度(以像素为单位)。
  • height:所插入的图像、SWF 文件或影片剪辑的高度(以像素为单位)。
  • align:指定文本字段中嵌入图像的水平对齐方式。 有效值为 leftright。 默认值为 left
  • hspace:指定图像周围不显示任何文本的水平空间量。 默认值为 8。
  • vspace:指定图像周围不显示任何文本的垂直空间量。 默认值为 8。
  • id:指定包含嵌入的图像文件、SWF 文件或影片剪辑的影片剪辑实例(由 Flash Player 创建)的名称。 该属性可用于控制使用 ActionScript 嵌入的内容。
  • checkPolicyFile:指定 Flash Player 将检查服务器上与图像的域相关的跨域策略文件。 如果跨域策略文件存在,则此文件中列出的域中的 SWF 文件可以访问加载图像的数据,例如通过调用以此图像作为 source 参数的 BitmapData.draw() 方法。 有关详细信息,请参阅《ActionScript 3.0 编程》中的“Flash Player 安全性”一章。

Flash 以完全大小显示文本字段中嵌入的媒体。 若要指定嵌入的媒体的尺寸,请使用 <img> 标签的 heightwidth 属性。

通常情况下,文本字段中嵌入的图像显示在 <img> 标签后的行上。 但是,如果 <img> 标签是文本字段中的第一个字符,则该图像显示在文本字段的第一行上。

斜体标签 <i> 标签以斜体形式显示标签中的文本。 斜体必须可用于所使用的字体。
列表项标签 <li> 标签在所包含的文本前放置项目符号。 注意:因为 Flash Player 无法识别有序和无序列表标签(<ol><ul>),所以这些标签无法修改列表的呈现方式。 所有列表都是无序的,所有列表项都使用项目符号。
段落标签 <p> 标签创建一个新段落。 若要使用此标签,您必须将文本字段设置为多行文本字段。 <p> 标签支持以下属性:

  • align:指定段落内文本的对齐方式;有效值为 leftrightjustifycenter
  • class:指定 flash.text.StyleSheet 对象定义的 CSS 样式类。
Span 标签 <span> 标签只可用于 CSS 文本样式。 它支持以下属性:

  • class:指定 flash.text.StyleSheet 对象定义的 CSS 样式类。
文本格式标签 使用 <textformat> 标签可在文本字段中使用 TextFormat 类的段落格式设置属性的子集,其中包括行距、缩进、边距和 Tab 停靠位。 您可以将 <textformat> 标签与内置 HTML 标签结合使用。

<textformat> 标签具有以下属性:

  • blockindent:指定块缩进(以磅为单位);对应于 TextFormat.blockIndent
  • indent:指定从左边距到段落中第一个字符的缩进;对应于 TextFormat.indent。 正数和负数均可以接受。
  • leading:指定行与行之间的前导量(垂直间距);对应于 TextFormat.leading。 正数和负数均可以接受。
  • leftmargin:指定段落的左边距(以磅为单位);对应于 TextFormat.leftMargin
  • rightmargin:指定段落的右边距(以磅为单位);对应于 TextFormat.rightMargin
  • tabstops:将自定义 Tab 停靠位指定为一个非负整数的数组;对应于 TextFormat.tabStops
下划线标签 <u> 标签为标签文本添加下划线。

Flash Player 支持以下 HTML 实体:

实体 Description
&lt; < (小于)
&gt; > (大于)
&amp; &(和)
&quot; “(双引号)
&apos; ‘(撇号,单引号)

Flash 还支持显式字符代码,如 &#38;(ASCII 和号)和 &#x20AC;(Unicode € 符号)。

Flash Actionscript 3.0 位图九宫格切片代码

来源:http://bbs.9ria.com/thread-235526-1-1.html

package cn.flashk.controls.support{
	import flash.display.Bitmap;
	import flash.display.BitmapData;
	import flash.geom.Matrix;
	import flash.geom.Point;
	import flash.geom.Rectangle;

	/**
	* <p>Scale9GridBitmap 用来创建位图的九宫格缩放。(因为flash本身的九宫格缩放并不支持位图,只支持矢量)</p>
	* 
	* 要使用位图的九宫格,请先传递原始的图像到sourceBitmapData属性,scale9GridBitmap.sourceBitmapData = bitmapData实例
	* 然后直接设置width和height属性。(此时scaleX和scaleY始终为1,set width和set height函数已经被重写)。
	* 虽然你仍然可以设置scale横向缩放和竖向缩放,不过不建议使用设置scaleX和scaleY属性缩放。要使用scaleX而又要开启九宫格,请使用 b.width = b.width 乘以 b.scaleX这样的语法。
	*/

	public class Scale9GridBitmap extends Bitmap {
		/**
		* 九宫格左边竖线与0坐标的距离
		*/
		public var leftLineSpace:uint = 8;
		/**
		* 九宫格右边竖线与图像最右像素的距离
		*/
		public var rightLineSpace:uint = 8;
		/**
		* 九宫格上面横线与0坐标的距离
		*/
		public var topLineSpace:uint = 6;
		/**
		* 九宫格下面横线与图像最下像素的距离
		*/
		public var bottomLineSpace:uint = 6;
		/**
		* 控制再拉伸九宫格位图时是否对中间的部分开启平滑处理,默认关闭,开启将获得更好的渐变效果,设置为 true 的情况下绘制位图要比在设置为 false 的情况下执行相同操作更为缓慢,请注意此参数与smoothing属性的区别,smoothing是指控制在整个位图缩放时是否进行平滑处理。
		* smoothing在这里只影响小数坐标时是否平滑处理,因为Scale9GridBitmap的在重设宽高时scaleX和scaleY始终为1(set width和set height函数已经被重写,但你仍然可以自己设置scaleX,此时smoothing会有效果)
		* 
		* <p>修改scaleSmoothing只会在下一次更改宽高时生效,并不会立即刷新图像,如果需要立即刷新,请调用update函数</p>
		* 
		* @see #update()
		*/
		public var scaleSmoothing:Boolean = false;

		protected var sourceBD:BitmapData;
		protected var _width:uint=0;
		protected var _height:uint=0;
		protected var bd:BitmapData;

		public function Scale9GridBitmap() {
		}

		/**
		* 设置Scale9GridBitmap的原始未缩放的源数据,可以与其他 Bitmap 共用一个 Bitmapdata。因为Scale9GridBitmap在重设宽高需要重新计算bitmapdata数据,需要以此属性的数据做参考,Scale9GridBitmap并不会修改此属性中的像素数据。只会修改自身bitmapdata属性的数据。
		*/
		public function set sourceBitmapData(value:BitmapData):void {
			sourceBD = value;
			this.bitmapData = sourceBD;
			if (_height==0) {
				_height = sourceBD.height;
			}
			if (_width == 0) {
				_width = sourceBD.width;
			}
		}

		public function useSourceSize():void {
			this.bitmapData = sourceBD;
			_height = sourceBD.height;
			_width = sourceBD.width;
		}

		/**
		* 更改Scale9GridBitmap的宽度,修改此值将重新计算Scale9GridBitmap的bitmapData数据,如果height值与源图像相同,只修改width将采用3分法加速
		* 
		* @see #scaleGrid3()
		* @see #update()
		*/
		override public function set width(value:Number):void {
			if (uint(value) == _width) {
				return;
			}
			_width = uint(value);
			if (sourceBD == null) {
				return;
			}
			if (_width == sourceBD.width && _height == sourceBD.height) {
				this.bitmapData = sourceBD;
				return;
			}
			if (_height == sourceBD.height) {
				scaleGrid3();
			} else {
				scaleGrid9();
			}
		}

		/**
		* 更改Scale9GridBitmap的高度,修改此值将重新计算Scale9GridBitmap的bitmapData数据,如果width值与源图像相同,只修改height将采用3分法加速
		* 
		* @see #scaleGrid3V()
		* @see #update()
		*/
		override public function set height(value:Number):void {
			if (uint(value) == _height) {
				return;
			}
			_height = uint(value);
			if (_width == sourceBD.width && _height == sourceBD.height) {
				this.bitmapData = sourceBD;
				return;
			}
			if (_width == sourceBD.width) {
				scaleGrid3V();
			} else {
				scaleGrid9();
			}
		}

		/**
		* 立即重新计算图像,如果sourceBitmapData的数据有更新,调用此方法立即刷新Scale9GridBitmap与sourceBitmapData同步,请注意Scale9GridBitmap的bitmapData始终与sourceBitmapData是两份不同的数据和对象
		*/
		public function update():void {
			if (sourceBD && _width == sourceBD.width && _height == sourceBD.height) {
				this.bitmapData = sourceBD;
				return;
			}
			if (sourceBD && _width == sourceBD.width) {
				scaleGrid3V();
			} else if (sourceBD && _height == sourceBD.height) {
				scaleGrid3();
			} else {
				scaleGrid9();
			}
		}

		/**
		* 横向3分格启用加速
		*/
		protected function scaleGrid3():void {
			if (bd != null) {
				bd.dispose();
			}
			bd = new BitmapData(_width,_height,true,0);
			bd.copyPixels( sourceBD,new Rectangle(0,0,leftLineSpace,_height),new Point(0,0) );
			var tmpBD:BitmapData;
			tmpBD = new BitmapData(sourceBD.width-leftLineSpace-rightLineSpace,sourceBD.height,true,0);
			tmpBD.copyPixels(sourceBD,new Rectangle(leftLineSpace,0,tmpBD.width,tmpBD.height),new Point(0,0) );
			var mat:Matrix = new Matrix();
			var sca:Number = (_width-leftLineSpace-rightLineSpace)/(sourceBD.width-leftLineSpace-rightLineSpace);
			mat.scale(sca,1);
			mat.tx = leftLineSpace;
			bd.draw(tmpBD,mat,null,null,new Rectangle(leftLineSpace,0,_width-leftLineSpace-rightLineSpace,_height),scaleSmoothing );
			bd.copyPixels( sourceBD,new Rectangle(sourceBD.width-rightLineSpace,0,rightLineSpace,_height),new Point(_width-rightLineSpace,0) );
			this.bitmapData = bd;
			tmpBD.dispose();
		}

		/**
		* 竖向3分格启用加速
		*/
		protected function scaleGrid3V():void {
			if (bd != null) {
				bd.dispose();
			}
			bd = new BitmapData(_width,_height,true,0);
			bd.copyPixels( sourceBD,new Rectangle(0,0,_width,_height),new Point(0,0) );
			var tmpBD:BitmapData;
			tmpBD = new BitmapData(sourceBD.width,sourceBD.height-topLineSpace-bottomLineSpace,true,0);
			tmpBD.copyPixels(sourceBD,new Rectangle(0,topLineSpace,tmpBD.width,tmpBD.height),new Point(0,0) );
			var mat:Matrix = new Matrix();
			var sca:Number = (_height-topLineSpace-bottomLineSpace)/(sourceBD.height-topLineSpace-bottomLineSpace);
			mat.scale(1,sca);
			mat.ty = topLineSpace;
			bd.draw(tmpBD,mat,null,null,new Rectangle(0,topLineSpace,_width,_height-topLineSpace-bottomLineSpace),scaleSmoothing );
			bd.copyPixels( sourceBD,new Rectangle(0,sourceBD.height-bottomLineSpace,_width,bottomLineSpace),new Point(0,_height-bottomLineSpace) );
			this.bitmapData = bd;
			tmpBD.dispose();
		}

		protected function scaleGrid9():void {
			if (bd != null) {
				bd.dispose();
			}
			var tmpBD:BitmapData;
			bd = new BitmapData(_width,_height,true,0);
			var scaX:Number=(_width-leftLineSpace-rightLineSpace)/(sourceBD.width-leftLineSpace-rightLineSpace);
			var scaY:Number = (_height-topLineSpace-bottomLineSpace)/(sourceBD.height-topLineSpace-bottomLineSpace);
			var mat:Matrix;
			tmpBD = new BitmapData(sourceBD.width-leftLineSpace-rightLineSpace,topLineSpace,true,0);
			tmpBD.copyPixels(sourceBD,new Rectangle(leftLineSpace,0,tmpBD.width,tmpBD.height),new Point(0,0) );
			mat= new Matrix();
			mat.scale(scaX,1);
			mat.tx = leftLineSpace;
			bd.draw(tmpBD,mat,null,null,new Rectangle(leftLineSpace,0,_width-leftLineSpace-rightLineSpace,topLineSpace),scaleSmoothing );
			if (bottomLineSpace == topLineSpace) {
				tmpBD.fillRect(new Rectangle(0,0,tmpBD.width,tmpBD.height),0);
			} else {
				tmpBD.dispose();
				tmpBD = new BitmapData(sourceBD.width-leftLineSpace-rightLineSpace,bottomLineSpace,true,0);
			}
			tmpBD.copyPixels(sourceBD,new Rectangle(leftLineSpace,sourceBD.height-bottomLineSpace,tmpBD.width,tmpBD.height),new Point(0,0) );
			mat.ty = _height-bottomLineSpace;
			bd.draw(tmpBD,mat,null,null,new Rectangle(leftLineSpace,_height-bottomLineSpace,_width-leftLineSpace-rightLineSpace,bottomLineSpace),scaleSmoothing );
			mat= new Matrix();
			mat.scale(1,scaY);
			tmpBD.dispose();
			tmpBD = new BitmapData(leftLineSpace,sourceBD.height-topLineSpace-bottomLineSpace,true,0);
			tmpBD.copyPixels(sourceBD,new Rectangle(0,topLineSpace,tmpBD.width,tmpBD.height),new Point(0,0) );
			mat.ty = topLineSpace;
			bd.draw(tmpBD,mat,null,null,new Rectangle(0,topLineSpace,leftLineSpace,_height-topLineSpace-bottomLineSpace),scaleSmoothing );
			if (rightLineSpace == leftLineSpace) {
				tmpBD.fillRect(new Rectangle(0,0,tmpBD.width,tmpBD.height),0);
			} else {
				tmpBD.dispose();
				tmpBD = new BitmapData(rightLineSpace,sourceBD.height-topLineSpace-bottomLineSpace,true,0);
			}
			tmpBD.copyPixels(sourceBD,new Rectangle(sourceBD.width-rightLineSpace,topLineSpace,tmpBD.width,tmpBD.height),new Point(0,0) );
			mat.tx = _width-rightLineSpace;
			bd.draw(tmpBD,mat,null,null,new Rectangle(_width-rightLineSpace,topLineSpace,rightLineSpace,_height-topLineSpace-bottomLineSpace),scaleSmoothing );
			mat = new Matrix();
			mat.scale(scaX,scaY);
			tmpBD.dispose();
			tmpBD = new BitmapData(sourceBD.width-leftLineSpace-rightLineSpace,sourceBD.height-topLineSpace-bottomLineSpace,true,0);
			tmpBD.copyPixels(sourceBD,new Rectangle(leftLineSpace,topLineSpace,tmpBD.width,tmpBD.height),new Point(0,0) );
			mat.tx = leftLineSpace;
			mat.ty = topLineSpace;
			bd.draw(tmpBD,mat,null,null,new Rectangle(leftLineSpace,topLineSpace,_width-leftLineSpace-rightLineSpace,_height-topLineSpace-bottomLineSpace),scaleSmoothing );
			tmpBD.dispose();
			bd.copyPixels(sourceBD,new Rectangle(0,0,leftLineSpace,topLineSpace),new Point(0,0) );
			bd.copyPixels(sourceBD,new Rectangle(0,sourceBD.height-bottomLineSpace,leftLineSpace,bottomLineSpace),new Point(0,_height-bottomLineSpace) );
			bd.copyPixels(sourceBD,new Rectangle(sourceBD.width-rightLineSpace,0,rightLineSpace,topLineSpace),new Point(_width-rightLineSpace,0) );
			bd.copyPixels(sourceBD,new Rectangle(sourceBD.width-rightLineSpace,sourceBD.height-bottomLineSpace,rightLineSpace,bottomLineSpace),new Point(_width-rightLineSpace,_height-bottomLineSpace) );
			this.bitmapData = bd;
		}

	}
}
 

Java (Android) 学习笔记

(以下内容为AIDE)

数据类型有关
System.out.println(“Result: “+3.1415+2)  //Result: 3.14152
System.out.println(“Result: “+(3.1415+2))
//Result: 5.141500000000001
System.out.println(“Result: “+(3.1415F+2F))
//Result: 5.1415
System.out.println(“Result: “+(3/2))
//Result: 1
System.out.println(“Result: “+(3.0/2.0)
//Result: 1.5
System.out.println(“Result: “+(3F/2F)
//Result: 1.5

类型转换
String.valueOf(); //

设置输入法类型
editText.setInputType(EditorInfo.*);

设置焦点(下列三个属性必须同时设置)
editText.setFocusable(true);   
editText.setFocusableInTouchMode(true);
editText.requestFocus();

VB.NET 学习笔记

Visual Studio LOGO
Visual Studio LOGO

‘数组相关
dim 数组长度 as integer=12
dim 数组(数组长度-1) as byte() ‘数组长度-1:为数组下标最大值
msgbox(数组.length) ’12

‘如何让文本框自动滚动
textbox1.appendtext(“test”)
textbox1.scrolltocaret()

‘让listviewItem可见
Listview.FindItemWithText(“test”).EnsureVisible()

‘鼠标坐标
System.Windows.Forms.Cursor.Position
Control.MousePosition

‘权限
Imports System.Security.Principal

Module 权限
Public Function 是否为管理员()
Dim identity As WindowsIdentity = WindowsIdentity.GetCurrent()
Dim principal As WindowsPrincipal = New WindowsPrincipal(identity)
Return principal.IsInRole(WindowsBuiltInRole.Administrator)
End Function
End Module

限制 DataGridView 某列只能输入数字(参考这里

 Private Sub TextBoxDec_KeyPress(sender As Object, e As KeyPressEventArgs)
        If e.KeyChar <> "8" And Not Char.IsDigit(e.KeyChar) And e.KeyChar <> "." Then
            e.Handled = True
        End If
    End Sub
    Private Sub DataGridView1_EditingControlShowing(sender As Object, e As DataGridViewEditingControlShowingEventArgs) Handles DataGridView1.EditingControlShowing
        Dim columnIndex As Integer = 4
        If DataGridView1.CurrentCell.ColumnIndex = columnIndex Then
            AddHandler e.Control.KeyPress, AddressOf TextBoxDec_KeyPress
        Else
            RemoveHandler e.Control.KeyPress, AddressOf TextBoxDec_KeyPress
        End If

        Me.Text = DataGridView1.CurrentCell.ColumnIndex.ToString
    End Sub

    Private Sub Form1_Load(sender As Object, e As EventArgs) Handles Me.Load
        DataGridView1.EditMode = DataGridViewEditMode.EditOnEnter
    End Sub

获取当前程序路径及程序名
Application.ExecutablePath

获取程序启动参数(注:参数前后有双引号)
dim para as String=Microsoft.VisualBasic.Command

vb.net 释放项目内文件

百度搜索了一大堆,发现大部分说得都不够详细,于是只好自己记录下了。

  1. 添加文件
    菜单:【项目】>【添加现有项】,在弹出的对话框内选择相应文件(比如:Loading.swf)。
  2. 设置文件属性
    在【解决方案资源管理器】内,找到刚添加的文件Loading.swf,右击选择【属性】
    将其【生成操作】一栏参数设为【嵌入的资源】
  3. 添加代码
    Public Sub 释放文件(ByVal 文件名 As String, ByVal 路径 As String)
          Try
                Dim 文件流 As IO.Stream = Reflection.Assembly.GetExecutingAssembly.GetManifestResourceStream(My.Application.Info.AssemblyName + "." + 文件名)   '获取资源文件的流
                Dim 文件内容(文件流.Length - 1) As Byte  '定义数组
                Dim 新文件 As New IO.FileStream(路径 + "\" + 文件名, IO.FileMode.OpenOrCreate)   '创建文件
                文件流.Read(文件内容, 0, 文件内容.Length)
                新文件.Write(文件内容, 0, 文件内容.Length)
                文件流.Close()
                新文件.Close()
          Catch ex As System.IO.D
    irectoryNotFoundException
                MessageBox.Show("未找到以下路径:" + 路径, "错误", MessageBoxButtons.RetryCancel, MessageBoxIcon.Error)
          Catch ex As System.NullReferenceException
                MessageBox.Show("未发现资源文件:" + 文件名, "错误", MessageBoxButtons.OK, MessageBoxIcon.Error)
          Catch ex As exception
                Msgbox(ex.message)
          End Try
    End Sub
  4. 在需要的地方调用上述函数即可。如释放文件(“Loading.swf”, 存储位置)注:区分大小写,且不管该文件是否放在某一特定文件夹内都应只写文件名(C#需包含具体文件夹名)。

案例下载:链接: http://pan.baidu.com/s/1sjoFgiL 密码: 3dn6

另请参阅:http://www.cnblogs.com/chiname/articles/133034.html